Friday, August 19, 2011

HYPER TERMINAL TEST FOR TROUBLE SHOOTING RS-232(serial port)

Hi friends, are you struck with problems when using serial port during programming micro controllers like getting error message"no response from from micro controller" ???or you have trouble in interfacing computer with external slave processor like micro controller to transfer
data between them.then you are at the right place.
In this tutorial i will give you the way how we troubleshoot the serial port.by troubleshooting you can find out whether your serial port is working properly or not.The method used for this known as "HYPER TERMINAL TEST".

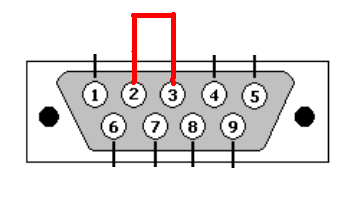
This is how a serial port(DB-9) looks like,shown below:


Pin 2--->data receive
Pin 3--->data transmit
Pin 5---> GND

Step1:
-------
Short the pins 2 and 3 as shown in the figure.

Step2:
-------
Now go to start menu in your PC

Start Menu--->All programms--->Accessories--->Communications--->Hyper Terminal

Step3:
-------
When you click hyper terminal,you will get a window as shown in the snap below
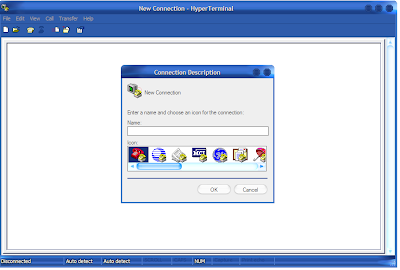
enter some name to the connection (i named it "venkatesh") and click 'ok'.

Step4:
------
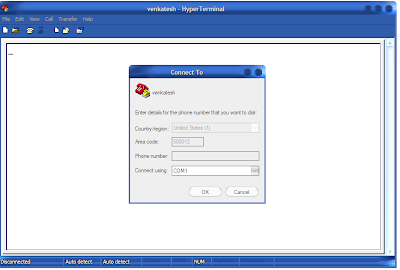
you get a window prompting you to enter location
enter some location and pincode.
select 'connect using' as COM1 and click 'ok'

Step5:
-------
Then you get a window shown below,with small window "com1" settings
select
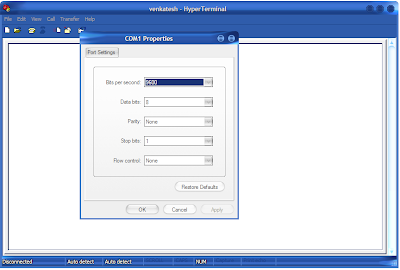
bits persecond as "9600"
data bits as "8"
parity as "none"
stop bits as "1"
and flow control as "none"
Now click "apply" and "ok"
Step6:
-------
A blank window appears as shown below with cursor blinking.

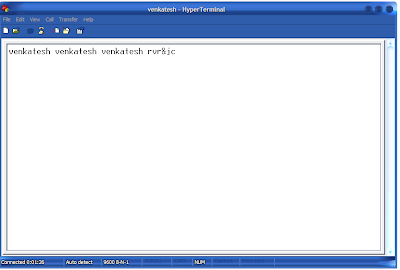
keep shorting the pins 2 and 3,type some text with the keyboard
Now , if you can see the text you typed on the window.
then it means that there is no problem with your serial port and every thing is correct with
the PC,if not there is some thing wrong with the PC serial port.
Hence your serial port is TESTED.

Up to this point i have just told you the process to trouble shoot the serial port but didn't tell you
the logic behind what we did actually.
what is the logic behind this hyperterminal test?????

generally
1.whatever input we give from the keyboard,it comes out through the serial port pin 3.
2.and whatever input we get from the serial port pin2,we can display that in hyper terminal
using the above settings.
so keeping this as basis just come back to what we did,we shorted the pins 2 and 3.
by that,what we type in the keyboard is sent to pin3 first and then back to pin2(as they are shorted),so the characters typed by us on the keyboard are displayed back to us:)

Hope you enjoyed the tutorial,for any queries and comments,just post them here or to my mail
have a good day bye:)
--Regards
Venkatesh

Friday, August 5, 2011

89V51XX PROGRAMMER USING SERIAL PORT

89v51xx series are very special series of microcontrollers in 8051 family as
they are dead easy to burn and these microcontrollers have more flash memory
compared to 89s series and 89c series.
these microcontrollers are manufactured by NXP(founded by philips).
they are boon to the beginners who dont have a parallel port and cannot make
89sxx serial programmer,as microcontrollers are "IN SYSTEM PROGRAMMABLE"(ISP)
these micro controllers have ISP through UART.which means that,it requires only one level conversion MAX232 ic between the computer serial port and the microcontroller.more
the burning process is carried out only by two pins TXD(transmit) and
RXD(receive).and the program is burned to FLASH ROM via UART through these
pins.
89v51RD2 programmer circuit:

click on image to enlarge


89v51rx2.h headerfile download for keil IDE programming in 'c'
software tools:
After the circuit is connected as shown in the above schematic,we should use
a software to send the program bits(burn) in to the microcontrollers FLASH ROM
the software specially dedicated for this philips microcontrollers is
called "FLASH MAGIC".
detailed step by step procedure is given with snapshots below.
step1:
------
select the device name,am using 89v51RD2 here as an example.
step2:
------
select com port as com1 and make sure that no other peripherals are connected
to com port.
step3:
-----
select moderate baud rate,choose minimum while you work for the first time
later you can increase to optimum,by increasing step by step.
step4:
------
select interface as none(isp).
step5:
------
browse for the .hex file to be burned to the microcontroller.

step6:
------
now click start buttton,this starts burning process.
step7:
------
the burning status is shown in the bar.
step8:
------
when the burning process is finished,you get the "finish" message.
now your device is programmed successfully!!!!
so enjoy!!!!:)

EXTRA READING:
--------------
1.some microcontrollers which support this method are 89v51RD2,89v51RB2,
89v51Rc2,89v52x2,89v660,89v662,89v664....etc.
2.you can remove the connection between the RESET and DTR and manually make
RESET high immediatly when the software is ready to start programming.
3.in the circuit given above,the RESET is connected to the DTR pin of serial
port,this takes care of making the RESET high during the burning process.
meaning whenever serial port is ready to burn ,it asserts DTR
(data terminal ready)pin(pin4 of DB-9)and hence making the RESET to go high.
4.one more speciality is that these microcontrollers can also be burnt
through parallelport method given in my previous tutorial.
5.if any program changes are made,the .hex file is automatically updated,no need
to select it again.

****any queries or comments ??? just post them here,or mail me,Thank you!!!!!!!!**********
-Regards
venkatesh

89SXX PARALLEL PORT PROGRAMMER USING LPT1

After we develop a program,we need to burn the .hex code file generated by c compiler in to the micro controller,for this we need some hardware that must be connected between the computer and the microcontroller.
The hardware is known as programmer or burner.there are different to burn the
program in to the EEPROM of the micro controller.
parallel port method(using LPT1):

click on image to enlarge


This method uses parallel port(LPT1)(DB-25)also called printer port,of computer
to burn the program.
and is very simple programming method has only 5 connections.
note:this parallel port programmer can be used to burn the microcontrollers
like 89s51 or 89s52. that is microcontrollers which has "IN SYSTEM PROGRAMMING"
(ISP) facility.
SOFTWARE TOOLS :
After the circuit is connected as shown in the above schematic,we should use
a software to fuse bits in to the EEPROM of microcontroller,the software i used
here is "ISP-Flashprogrammer 3.0a".install this software and u can see this window,
step by step procedure is shown below
step1:
------
The window shown in the snapshot appears as you open the software,browse the
.hex file to be burnt to the microcontroller,by clicking "open file".
step2:
------
now select the device to be programmed,we are using here 89s52 so select it.
step3:
------
now click "write",the status bar appears which indicates the status of
burning process.and as soon as the device is programmed.you will get a message
"programmed succesfully"
now your device is programmed successfully!!!!
so enjoy!!!!:)


EXTRA READING:
--------------
1.the microcontrollers which have ISP facility can only be programmed by this
method.
2.microcontrollers having ISP facility can be idetified by 's' in their name;
's' means in "system" programmable.
for example 89s52 in this name 's' indicates that this microcontroller is
having ISP facility and hence parallel port method can be used.
3.this method can be used to burn AVR family of microcontrollers also.
4.we can generalise that any microcontrollers which have MISO,MOSI,SCK pins
can be programmed through this method.
5.MISO is master in slave out,pin which takes bits in to master processor(PC)that
are given out by slave processor(microcontroller).
MOSI master out slave in,pin which gives bits out of master processor(PC) to
slave processor(microcontroller).
SCK pin is for the synchronisation of clock between master and slave.
6.all computers dont have parallelport,this is motherboard dependent and
most of old motherboards have parallelports where as new systems doesnt.
7.very important thing to be noted is converters like USB to PARALLELPORT converter
,or SERIAL to PARALLELPORT converters dont work.
ISP softwares send the program bits directly to the inbuilt parallelports only.
8.also dont use PCI peripheral interfaces they are waste of time and money,they
wont work for parallelport method.so the thing is parallelport must be originally of
mother board only.
9.no need to make any settings for selecting the parallelport,the software
automatically sends bits to the lpt1.
10.you can also use lock bit combinations to secure your program code.
*****any queries or comments ??? just post them here,or mail me,Thank you!!!!!!!!**********
-Regards
venkatesh

MINIMUM MICRO CONTROLLER CONNECTIONS

A microcontroller is not alone in a circuit,it must be having supporting
components to make it functional.
1.a crystal(12MHZ)and two capacitors(33pF).
2.RESET connection(RC circuit).
3.EA pin connected HIGH to Vcc(only when internal memory is used).
so the minimum microcontroller configuration is as shown in the schematic
below.

MINIMUM MICROCONTROLLER CONFIGURATION:

click on image to enlarge

note:keep this circuit in your memory we will encounter this minimum
configuration very often in our circuits.
EXTRA READING:
1.33pF capacitors are needed to remove unwanted ripple and stray oscillations.
2.crystal is needed to provide oscillations,which moves the instructions to
be executed by the CPU of microcontroller.greater is the crystal speed,
speeder the operation.generally a crystal of 12MHZ to
20MHZ can be used.it can be even high and is limited by microcontroller
fabrication.
3.RESET connection has RC elements which have characteristics of RC highpass
circuit.
4.when microcontroller is powered ON,the RC circuit generates a spike
(a triggering pulse)which makes RESET pin(9) logic'1' for small duration of
time.
when RESET is made high the microcontroller will reset and terminates
all acivities,and the program counter will point to
the first instruction of the program(0000 location of ROM) also all the
values in the registers will be lost.
5.each and every time the supply is switched ON the microcontoller RESETS with
this RC circuit.
6.in order for the RESET to be effective,it must have a minimum duration
of 2 machine cycles(2x12 crystal cycles)i.e 2x1.085uSec.so it must be high
for a minimum of 2 machine cycles before it goes low.
we discuss more about this machine cycles later.
7.a RC circuit with R=8.2k and C=10uF are used here in the circuit,which is
tested and gives our minimum duration of time for which the RESET must be high.
8.most of the 8051 family microcontrollers come with on chip ROM(EEPROM flash)
to store the programs.if the program is accesed from the internal ROM of micro
controller,then the EA pin is tied HIGH to Vcc.for family members such as
8031 there is no on chip ROM and the code is fetched from external ROM.
therefore for 8031 type the EA pin must be connected to LOW(GND),to indicate that
code is stored externally.EA stands for external access(pin 31).it is an input
pin and is connected to Vcc(for internal code access) or to GND(for external
access).it must not be left unconnected(floating).
*****any queries or comments ??? just post them here,or mail me,Thank you!!!!!!!!**********
-Regards
venkatesh

MICROCONTROLLERS POWER SUPPLY

Any microcontroller needs a powersupply to work,the supply must give constant
a constant output voltage.for all our microcontrollers we need a 5V supply.her
e is a simple circuit which gives a regulated supply voltage.and we constantly
use this in our every microcontroller project.

click on image to enlarge

EXTRA READING:
1.prefer to use 1Amp trasformer,as many can be connected to the single supply.
2.you can also half wave rectifier instead of a bridge rectifier,just modify
the rectification section.
3.a 7805 ic used here gives out a constant supply of 5V
4.the capacitors used there are for smoothening and
avoiding unwanted ripple.

89SXX ISP PROGRAMMER USING SERIAL PORT(COM1)

Generally parallel port method is preferred as it is very easy,but
what if we don't have a parallel port for our computer??
so the alternative is serial port programmer.
serial port programmer method uses serial port(DB-9)(com1).
This programmer is a bit complex circuit to construct compared to parallel port method.


89sxx serial programmer circuit:
click on image to enlarge


SOFTWARE TOOLS:

After the circuit is connected as shown in the above schematic,we should use
a software to fuse bits in to the EEPROM of microcontroller,the software i used
here is "ISP_PROG v1.4".install this software and u can see this window.

step1:
------
Now go to options menu and select
settings option,you will get a window asking you to set the com.
as we are using serial port,we select the option com1.and click "ok".


step2:
------


again go to options menu you can see select device option click it,you get
a select device window.select the device as 89s52,as we are using this micro
controller here.and then click "ok".
step3:
------


now select "write device" option and click "RUN" you can now see the status
of the burning of the device.
when the burning process is finished,you get the "finish" message.
now your device is programmed successfully!!!!
so enjoy!!!!:)


EXTRA READING:
---------------------
1.in this method the microcontroller cannot directly communicate with the serial
port of computer it communicates via another slave micro controller.
2.the slave micro controller used between the target microcontroller is pre-programmed
with a boot loader program,this program facilitates programming the micro via serial port.
more on boot loader here.
3.you can see in the figure the first microcontroller is connected to the serial
port of computer through MAX232.the serial port voltage
levels are incompatible with microcontroller voltage levels(TTL).
more about level conversion in my previous tutorial IC MAX232 FOR INTERFACING RS232
so this ic level converts between the serial port and the microcontroller.

4.The 89c2051 again uses a parallelport method to burn code in to it.
5.here the capacitors used around the MAX232 ic are used for clamping the
voltage levels.
6.if your computer dont even have this serial port(laptops dont have serialports),
no problem as every computer now a days have a USB connection,you can use a USB
to SERIAL PORT converter.
7.before using the USB to serial port converter,dont forget to install
USB to serial port drivers.otherwise the device wont be detected at all.
8.if the programmer doesnt work dont panic,there is an easy way of troubleshooting
the serial port,which is discussed in troubleshooting the serialport tutorial.
*****any queries or comments ??? just post them here,or mail me,Thank you!!!!!!!!**********
-Regards
venkatesh

Tuesday, April 26, 2011

MINI FM STATION

                                                               ABSTRACT

The aim of this project is to transmit voice and music in FM frequency band
(88-108MHZS) similar to what an FM station does.this is possible by frequency modulating the voice or music signal with a carrier.
                        The idea is very simple,the frequency of the carrier is varied linearly in accordance with the voice or music that we want to transmit.A colpitts oscillator produces necessary carrier oscillations. the carrier has some amount of frequency deviation with respect to the voice or music message.
                        The voice or music is pre-amplified in the first stage,A simple colpitts oscillator doesnt give any message information,it just gives a blank carrier oscillations.we must vary its frequency in accordance with the music or voice.in order to do it,The base emitter junction of the of the colpitts oscillator is biased with the voice or music signals .the voice or music signal voltage varies the junction capacitance of the oscillator.such that the capacitance of the junction is varied with the voice or music signal voltage.this variation in the capacitance inturn varies the frequency of oscillations.
                        hence the frequency variations are produced with the variations in the voice or music signal.
                      This frequency modulated signal is now ready to be transmitted across the free space.using a proper antenna with good matching characteristics we can transmit the frequency modulated signal in to air the form of electromagnetic radiations.
                       A commercial FM receiver can catch this electromagnetic radiations and convert it to electrical signal and demodulate it back to the original voice or music signal. demodulator is a commercial receiver which uses  a phase locked loop circuitry.
                    Hence following the method described above we can thus transmit and receive a voice and music signal wirelesly over the free space.


authors:

P.SHOBHA (Btech RVR&JC COLLEGE OF ENGG.)

S.VENKATESH (Btech RVR&JC COLLEGE OF ENGG.)

T.RAGHURAM (Btech RVR&JC COLLEGE OF ENGG.)

M.KRISHNA KANTH(Btech RVR&JC COLLEGE OF ENGG.)

P.PRABHATH(Btech RVR&JC COLLEGE OF ENGG.)

I sincerely thank authors,the students of "RVR&JC COLLEGE OF ENGG"

for their great support.

my special thanks to v.v.m.m.rao 

TO DOWNLOAD FULL PROJECT REPORT CLICK HERE


TELEPHONE EXCHANGE

                                                                  ABSTRACT

The project is all about building a model TEELEPHONE EXCHANGE that facilitates the connection of eight(8) telephones. Telephone exchange switches one telephone connecting to other. Infact it is not the only thing it does, but the set with which communication  required is generating  the  pulses when the relevant number is dialed. The important functions of  telephone exchange are:


1) To Decode and process the pulses generated by the telephone sets


2) To generate a dialing tone


3) To generate and pass on a ringing tone


4) To interconnect the sets as soon as the receiver is lifted


5) To prevent the third party/ set listening in;


 The exchange is provided with LEDs that show at all times which of the sets, if any, are engaged. An indicating LED indicates whether the exchange is engaged or not. This LED goes out only when the communication has been terminated i.e. , when the two relevant receivers have been replaced on their rests. All the telephone sets are powered from a common source via the stand by and speech lines; The connection between each of the sets and the exchange is therefore, in many cases is possible, via two lines only. The bell voltage is placed on the speech line via a relay. Calling one set from another is done by simply dialing or keying in the number of wanted set i.e., 1…8 

CONTN............READ MORE>>>>>>>

authors:

Y.VAMSI (Btech RVR&JC COLLEGE OF ENGG.)

N.PRAPOORNA  (Btech RVR&JC COLLEGE OF ENGG.)

R.BHUSHANAM (Btech RVR&JC COLLEGE OF ENGG.)

I sincerely thank authors,the students of "RVR&JC COLLEGE OF ENGG"

for their great support.

my special thanks to v.v.m.m.rao 

TO DOWNLOAD FULL PROJECT REPORT CLICK HERE

SATELLITE SIGNAL TRACKING SYSTEM

                                                      ABSTRACT

The Main objective of the project is to control the Satellite Dish Antenna movement according to the orbit of Satellite. It is useful to produce the maximum signal strength from the Satellite. For the purpose of practical demonstration we have constructed Antenna by using LDR ’s and substituted satellite with a laser light so that signal strength will be measured in terms of light intensity.

The project is designed with Micro Controller 89c51 and  stepper motor, motor driven circuit, LDR ’s and voltage comparators. The Antenna attached to the stepper motor rotating towards the forward direction and reverse direction.

Initially the program written in micro controller scans for the maximum light intensity (maximum signal strength) focused on the Antenna then stops rotation. When the light intensity is decreased again it looks for maximum light intensity and moving in incrementing direction. Again it stops rotation at maximum value. The rotating direction may be clockwise or anticlockwise.

All LDR ’s, limit switches are connected to the input port, motor is connected to output port of Micro Controller.

It is an useful project to rotate the Antenna in the direction of satellite.


CONTN............READ MORE>>>>>>>

authors:

Y.VAMSI (Btech RVR&JC COLLEGE OF ENGG.)

N.PRAPOORNA  (Btech RVR&JC COLLEGE OF ENGG.)

R.BHUSHANAM (Btech RVR&JC COLLEGE OF ENGG.)

I sincerely thank authors,the students of "RVR&JC COLLEGE OF ENGG"

for their great support.

my special thanks to v.v.m.m.rao 

TO DOWNLOAD FULL PROJECT REPORT CLICK HERE

Monday, April 25, 2011

HOME AUTOMATION OVER INTERNET

"Home Automation over internet". Most of the people thought of
controlling home appliances and other things like bulbs tubes and
switches etc using an IR remote or a wired things running from your
computer to your switch board, but what if you are not at home and
suddenly you reminded that you have left something on but you are not
sure and you can't even go back.. so what can you do? Don't worry
friends solution is here. now access your fully automated home from
anywhere in the world that the power of internet... ;-)

So talking about the main thing which you can say the backbone of this
project is the HOME AUTOMATION SERVER this software helps you to
emulate your serial communication over a very famous remote access
utility called TELNET. So basically a telnet server is created at your
host PC. A screen shot of the working software is shown below. 


Figure 1: Home Automation Server Software


Figure 2 shows a block diagram of the full system. 

We have switches and home appliances that are to be controlled. The embedded hardware
is then connected to your PC via serial communication running at 9600
8-n-1 configuration. The HA server is running on the PC with any
operating system, with PC's IP configured. You can use a DNS server if
you want access all over the internet and if you are using it on LAN
then you can have a fix IP within that domain. So using the telnet
command with the ip address of the server you can connect to the
server. 

Figure 3 and 4 shows the schematic diagram for home automation project
as you can see, we are using LEDs to denote bulbs, tubes and Switches.
As per the program, the tubes are connected at P1.0 and P1.1; Bulbs
are connected at P1.2, P1.3 and P1.4; and switched are connected at
P1.5, P1.6 and P1.7. The LCD (16x2 LCD) is connected at P2; and three
switches which are used to read the messages i.e. P3.2 for read
message, P3.3 for next message and P3.4 for Previous Message. Because
of the lack of RAM we can only support maximum of three messages. 


Figure 3: Control, Display and PC interface section


Figure 4: Appliance and Power Supply section.

Following are the commands which are used in our project. 

COMMAND

DESCRIPTION

stat

To get the status of all the appliances connected to the controller.

tube

To switch ON/OFF the tubes. Selecting any one out of two.

Bulb

To switch ON/OFF the bulbs, selecting any one out of the three bulbs.

swch

To switch ON/OFF the switches connected to the controller, selecting
anyone out of three switches.

msg

To leave a message. Maximum of three messages and each containing
maximum 28 characters.

?

To display help menu.

The source code and the software HA server for the Home Automation
Project can be downloaded from link below. It also contains a help
file which will help guide you how to use the software.
Old Source code with help
HA Server

Changes in the new code!

added dimmness of LED

Schematic updated

LED indicator for new message
download the new code here NEW Source code

This article is borrowed from the ajay bhargav's website 

SOURCE:  http://www.kmitl.ac.th

Sunday, April 24, 2011

GSM BASED DATA AQUISITION SYSTEM

ABSTRACT

                    GSM Data Acquisition System is based on GSM Cellular Network. In this project we monitor the data in room by sending required data values to selected phone numbers using GSM modem. Data values are like functions of remotely data, environment monitoring (support input DC 0-20MA), fire protection, anti-burglary, as well as intelligent remote control. It is widely used in industry, building, petroleum, rail-way, school...etc.

                  Data acquisition is the process of sampling signals that measure real world physical conditions and converting the resulting samples into digital numeric values that can be manipulated by a computer. Data acquisition systems (abbreviated with the acronym DAS or DAQ) typically convert analog waveforms into digital values for processing. Sensors convert physical parameters to electrical signals. Signal conditioning circuitry to convert sensor signals into a form that can be converted to digital values. Analog-to-digital converters convert conditioned sensor signals to digital values. Main Features of data acquisition systems are Data Monitoring, Fire Protection, Remotely Control Function, and Anti-burglary Function.

               GSM Data Acquisition System can monitor the AC/DC voltage remotely. The user can know the exact data (e.g. input voltage is AC 220 V) via SMS; also user can set the voltage alarm point. When the input voltage is higher or lower this point, the system will alarm. It will send SMS, as well as phone call to inform user immediately.

1. AC Voltage input monitoring (Range: 0-500V).

2. Frequency input monitoring for AC signals (50Hz).

3. Temperature Monitoring (Range: -10 to +60).


CONTN............READ MORE>>>>>>>

authors:

Y.VARAPRASAD(Btech RVR&JC COLLEGE OF ENGG.)

P.ANJANEYULU (Btech RVR&JC COLLEGE OF ENGG.)

A.THANUJA(Btech RVR&JC COLLEGE OF ENGG.)

N.V.SANTHI KUMAR (Btech RVR&JC COLLEGE OF ENGG.)

I sincerely thank authors,the students of "RVR&JC COLLEGE OF ENGG"

for their great support.

my special thanks to v.v.m.m.rao 

TO DOWNLOAD FULL PROJECT REPORT CLICK HERE

Friday, April 22, 2011

DESIGN OF L-BAND SPIRO HELICAL ANTENNA


                                                        ABSTRACT

 A novel antenna made of a spiral wire wrapped into a larger helical shape is introduced. The geometry of this antenna, which is a doubly helical structure, is fully described by five independent parameters, including two radial dimensions, two pitch angles, and the number of turns. Radiation properties of this antenna are examined both theoretically and experimentally. The Numerical Electromagnetic Code (NEC-2) is used to obtain simulation results. A large number of cases with different radii, pitch angles, and number of turns are investigated. Results for far-field patterns, gain, axial ratio, and bandwidth are presented. The influence of parameters on radiation properties is examined. Several prototypes of the antenna were constructed and tested using an outdoor antenna range. Measured far-field patterns are presented over a wide range of frequencies. The measured and computed radiation patterns are in good agreement.

The results of this study indicate that the proposed antenna provides circular polarization and high gain over a wide frequency range. For example, when the number of turns is 10, a gain of 11-14 dB, a bore sight axial ratio of less than 3 dB, and a half-power beam width of about 40 degrees are achieved over a 30% bandwidth. The side-lobe level for most cases examined is better than 10 dB below the main beam. A unique advantage of this antenna is its much smaller size compared with a conventional helical antenna made of straight wire shaped into a helix. Having about the same radiation characteristics, including gain, circular polarization, bandwidth, and side-lobe level, this new antenna occupies a volume more than 2.5 to 3 times smaller than the conventional helix. This reduction in size, which in turn may imply smaller weight and lower packaging and manufacturing costs, makes the proposed antenna very appealing to many communications and aerospace applications.


authors:

T.NAGA JYOTHI (Btech RVR&JC COLLEGE OF ENGG.)

MD.ROSHAN NAWAZ (Btech RVR&JC COLLEGE OF ENGG.)

B.PRAVEEN VENKATESH (Btech RVR&JC COLLEGE OF ENGG.)

M.ALEKHYA  (Btech RVR&JC COLLEGE OF ENGG.)

I sincerely thank authors,the students of "RVR&JC COLLEGE OF ENGG"

for their great support.

my special thanks to v.v.m.m.rao 

TO DOWNLOAD FULL PROJECT REPORT CLICK HERE

MOBILE SHIELD

                                                     
                                             ABSTRACT

                        The main objective of the term paper is to   protect your mobile phone from unauthorized use or theft using this simple circuit It can generate a loud chirping sound when somebody attempts to take away the mobile handset. The added feature is that the circuit also works as a mobile charger.             

                       Here we consider the operation of monostable and Astable multivibrators to perform our task. The circuit is powered by a step-down transformer X1 with rectifier diodes D1 and D2 and filter capacitance’s. Even the circuit can also be powered by direct dc supply of 12-15V. The circuit uses two NE555 timers, one to perform astable and other to perform monostable operations.

                The output of monostable is given to astable. The output frequency of the monostable is adjusted using preset VR1 such that it is slightly less than that of the astable. This makes the circuit standby, when there is no hand capacitance present. When a hand comes near the shield or makes contact with the shield, which introduces hand capacitance in the circuit. As a result, the astable’s frequency changes, which makes the trigger pin of the monostable low and its output oscillates. This produces chirping sound from the buzzer and also makes the LED1 blink. The circuit can also be used as a mobile charger. It provides output of 6V at 180 mA through regulator IC 7806 (IC4) and resistorR5 for charging the mobile phone.


authors:

R.VYSHNAVI (Btech RVR&JC COLLEGE OF ENGG.)

G.UDAY  (Btech RVR&JC COLLEGE OF ENGG.)

A.VIJAY BABU  (Btech RVR&JC COLLEGE OF ENGG.)

T.KISHORE (Btech RVR&JC COLLEGE OF ENGG.)

I sincerely thank authors,the students of "RVR&JC COLLEGE OF ENGG"

for their great support.

my special thanks to v.v.m.m.rao 

TO DOWNLOAD FULL PROJECT REPORT CLICK HERE

Thursday, April 21, 2011

AUTOMATED MEDICAL RADIOGRAPH COMPRESSION &DECOMPRESSION

ABSTRACT

                       Recently, teleradiology, which is one of the most used clinical aspects of telemedicine, has received much attention. Teleradiology attempts to transfer medical images of various modalities, like computerized tomography (CT) scans, magnetic imaging (MRI), ultrasonography (US), and x-rays from one location to another such as in hospitals, imaging centers or a physician’s desk.

                        Efficient storage and transmission of medical images in telemedicine is of utmost importance however, this efficiency can be hindered due to storage capacity and constraints on bandwidth. Thus, a medical image may require compression before transmission or storage. Ideal image compression systems must yield high quality compressed images with high compression ratio; this can be achieved using wavelet transform based compression. There is a general preference to use wavelet transforms in image compression because the compressed images and be obtained with higher compression ratios and higher PSNR values.

                         However, the choice of an optimum compression ratio is difficult as it varies depending on the content of the image. In a Principal Component Analysis based neural network was used for image compression. In a neural network quantizer was used to yield a high compression ratio while maintaining high quality images. The proposed method suggests that a trained neural network can learn the non-linear relationship between the intensity (pixel values) of a radiograph, or x-ray, image and its optimum compression ratio.

                         Once the highest compression ratio is obtained, while maintaining good image quality, the result reduction in radiograph image size, should make the storage and transmission of radiographs more efficient.


authors:

R.VYSHNAVI (Btech RVR&JC COLLEGE OF ENGG.)

G.UDAY  (Btech RVR&JC COLLEGE OF ENGG.)

A.VIJAY BABU  (Btech RVR&JC COLLEGE OF ENGG.)

T.KISHORE (Btech RVR&JC COLLEGE OF ENGG.)

I sincerely thank authors,the students of "RVR&JC COLLEGE OF ENGG"

for their great support.

my special thanks to v.v.m.m.rao 

TO DOWNLOAD FULL PROJECT REPORT CLICK HERE

Wednesday, April 20, 2011

NOISE REDUCTION USING SHIELDING

ABSTRACT

               With the advent of technology a lot of equipment use electromagnetic signals for their operation. The devices intentionally or unintentionally interfere with the operation of other circuits and effect their performance. For the proper functioning of the devices this interference needs to be avoided at least suppressed. With the advent of technology electronic/electrical systems are forced to work in the close proximity. So the effects of EMI are highly influencing the circuit operations.

               We studied vigorously about the electromagnetic interference and its nature. Also the methods of suppressing EMI. We laid emphasis on shielding method of suppressing EMI. At high frequency shielding is effective method. The shield must completely enclose the electronics and must have no penetrations such as holes, seams, slots or cables.

            In this paper we studied the shielding effectiveness of different metals like Copper, Aluminium, Gold, Lead and Silver, for various thicknesses. The Variation of Shielding Effectiveness with respect to the frequency are plotted and results are presented in the table. The shielding effectiveness is estimated up to 10MHz.          

                             Table 4.1 Relative Conductivity for Metals

      S.No.

         Metals

Relative conductivity

         1.

        Aluminium

             62

         2.

          Gold

             71

         3.

         Copper

             100

         4.

          Silver

              105

         5.

          Lead

               8

         6.

        Mercury

                2

         7.

           Zinc

               30

                 Table 4.2 Relative permeability for Metals

         S.No

      Metals

Relative Permeability

           1.

      Aluminium

            1

           2.

         Gold

            1

           3.

        Copper

            1

           4.

         Lead

            1

           5.

        Silver

            1

           6.

        Mercury

            1

           7.

        Zinc

            1


authors:

CH.SURYA PRABHA (Btech RVR&JC COLLEGE OF ENGG.)

G.SRINATH (Btech RVR&JC COLLEGE OF ENGG.)

A.L.S DURGA (Btech RVR&JC COLLEGE OF ENGG.)

B.SURESH (Btech RVR&JC COLLEGE OF ENGG.)

B.JILA (Btech RVR&JC COLLEGE OF ENGG.)

I sincerely thank authors,the students of "RVR&JC COLLEGE OF ENGG"

for their great support.

my special thanks to v.v.m.m.rao 

TO DOWNLOAD FULL PROJECT REPORT CLICK HERE